


Table of Contents
- The Mold Growth Timeline After Water Damage
- Environmental Factors That Control Mold Growth Speed
- Signs of Mold Growth in Walls and Other Hidden Areas
- How to Prevent Mold After a Leak or Water Intrusion
- DIY vs. Professional Mitigation: When to Call a Certified Team
- Post-Remediation Prevention: Stopping Mold From Coming Back
- Frequently Asked Questions
Last Updated: September 11, 2026
The Mold Growth Timeline After Water Damage
How fast does mold grow? It can begin in as little as 24 to 48 hours after water damage, which is why the first two days after a leak or flood decide how expensive your cleanup becomes. This guide from Ness Restoration & Remediation Inc. breaks down how fast does mold grow hour by hour, what accelerates it, and when to call a certified team.
Water damage is the trigger, but moisture is the fuel. Mold spores are already present in nearly every indoor environment, waiting for the right combination of wet materials, warmth, and stagnant air. The EPA’s guide to mold and moisture control confirms that without moisture, mold simply cannot grow, which means every hour you delay drying is an hour you give spores to germinate.
Hours 0-24: Germination Begins
Germination is the first stage of mold growth, when dormant spores absorb moisture and begin producing hyphae, the thread-like structures that anchor mold to a surface. Nothing is visible yet, but the clock has started. Porous materials like drywall, carpet padding, and insulation soak up water quickly and hold it near the surface, where spores settle.
A common mistake is assuming a surface that feels dry is safe. Hygroscopic materials can hold hidden moisture for days while looking normal to the touch.
Hours 24-48: Colonization Sets In
Colonization is when mold transitions from individual spores into a visible colony, and it happens fast once relative humidity stays above roughly 60%. Mycelium spreads across the wet surface, feeding on organic material in drywall paper, wood framing, and dust, and indoor air quality declines as airborne contaminants multiply.
The 24-48 hour window is the most important period in the timeline. Drying equipment, dehumidification, and airflow applied here often stop mold entirely; applied a week later, they only limit existing damage.
Waiting more than 48 hours to begin drying is the most common reason a small leak becomes a full remediation project. Once colonization sets in, cleaning the visible surface is not enough because hyphae have already grown into the material.
Days 3-7: Visible Growth and Sporulation
Sporulation is when mold releases new spores into the air to colonize other areas, typically within three to seven days of water intrusion. This is when most homeowners first notice discoloration, a musty odor, or allergy-like symptoms, and contamination has likely spread to adjacent materials through airflow and HVAC systems.
At this stage, the difference between surface mold and deep-seated growth matters enormously. Surface mold wipes away and stays gone; deep-seated growth has penetrated porous materials and requires removal, not cleaning.
| Timeframe | Stage | What’s Happening | Best Action |
|---|---|---|---|
| 0-24 hours | Germination | Spores absorb moisture, hyphae form | Extract water, start airflow |
| 24-48 hours | Colonization | Mycelium spreads across surfaces | Dehumidify, dry porous materials |
| 3-7 days | Sporulation | Spores release, growth becomes visible | Isolate area, call a certified team |
| 7+ days | Deep-seated growth | Mold penetrates structural materials | Professional remediation |
Environmental Factors That Control Mold Growth Speed
Temperature, humidity, and material type decide whether mold takes two days or two weeks to appear. The CDC’s guidance on mold and dampness notes that mold thrives in warm, damp conditions, and controlling those conditions is the most reliable way to slow growth. What most guides skip is that these factors do not act independently, they compound, and the material the water landed on sets the ceiling on how fast everything else can move.
Humidity, Temperature, and Dew Point
Mold proliferates fastest when relative humidity sits between 60% and 80% and temperatures stay between roughly 70°F and 90°F. Below about 60% relative humidity, growth slows sharply; below 50%, most common indoor molds stall out entirely. Above 90°F, many species slow down again.
The dew point matters just as much. When a surface cools below the dew point, condensation forms a water film that feeds microbial growth even without a visible leak. Cold exterior walls, uninsulated crawl spaces, poorly sealed windows, and ductwork through humid unconditioned space are common condensation zones, which is why mold sometimes appears with no plumbing leak at all.
Dehumidification below 50% relative humidity is the practical target, it starves mold without making the space uncomfortable. But a dehumidifier only manages the air it can reach; sealed wall cavities and the underside of carpet padding stay wet long after the room’s air reads dry on a hygrometer.
Material Type: How Fast Mold Grows on Drywall, Wood, Carpet, and Fabric
Material type changes the timeline dramatically. Non-porous surfaces like tile, metal, glass, and sealed concrete support only surface contamination, which cleans up easily. Porous materials behave very differently:
- Drywall and ceiling tile: The paper facing is a ready food source, and the gypsum core wicks water laterally. Colonization can begin within 24-48 hours of saturation, and the paper face often shows discoloration before the core is visibly affected. Drywall that has soaked through usually cannot be dried in place.
- Wood framing and subfloor: Solid wood is slower to colonize than drywall paper because the surface is less nutrient-rich, but it holds moisture far longer. Framing can stay above the safe moisture threshold for a week or more after the visible water is gone, which is why moisture-meter readings, not appearance, drive the decision to replace or dry.
- Carpet and padding: The backing and padding trap water underneath the pile. Padding is nearly impossible to dry fully in place, and trapped moisture keeps feeding growth under a carpet that looks and feels fine on top. Growth under padding is often well established by day three.
- Fabric, upholstery, and clothing: Cellulose-based and organic fabrics absorb and hold moisture like a sponge. A soaked couch cushion or stacked textiles can support visible growth within 48-72 hours, and the odor usually arrives before the discoloration.
- Insulation: Holds moisture invisibly and rarely dries in place. Wet batts typically need removal, they lose insulating value and keep the adjacent framing damp.
- Concrete and masonry: Porous in a different way, it absorbs and releases moisture slowly. Surface growth is common, but deep penetration is limited, and drying takes far longer than the surface suggests.
The practical takeaway: the same leak produces a different timeline depending on what it touched. A supply-line drip onto drywall can colonize in a day; the same drip onto sealed concrete may never progress past surface contamination. When triaging, rank wet materials by how fast they colonize and how hard they are to dry, and deal with drywall, padding, and insulation first.
If your carpet padding has been wet for more than a day, replacing it is usually faster and cheaper than trying to dry it. Carpet padding is nearly impossible to dry fully in place, and trapped moisture will keep feeding mold growth.
The Compounding Effect
These factors multiply rather than add. Warm air plus high humidity plus a porous material plus stagnant air is the fastest combination; remove any one and the timeline stretches. That is why the most effective interventions are the boring ones, pull the air out, pull the water out, and keep the space below 50% relative humidity until a moisture meter says the materials themselves are dry, not just the air around them.
Signs of Mold Growth in Walls and Other Hidden Areas
Signs of mold growth in walls include musty odors, warped or bubbling paint, dark staining near baseboards, and unexplained allergy symptoms that worsen indoors. Visible mold is often the last sign to appear.
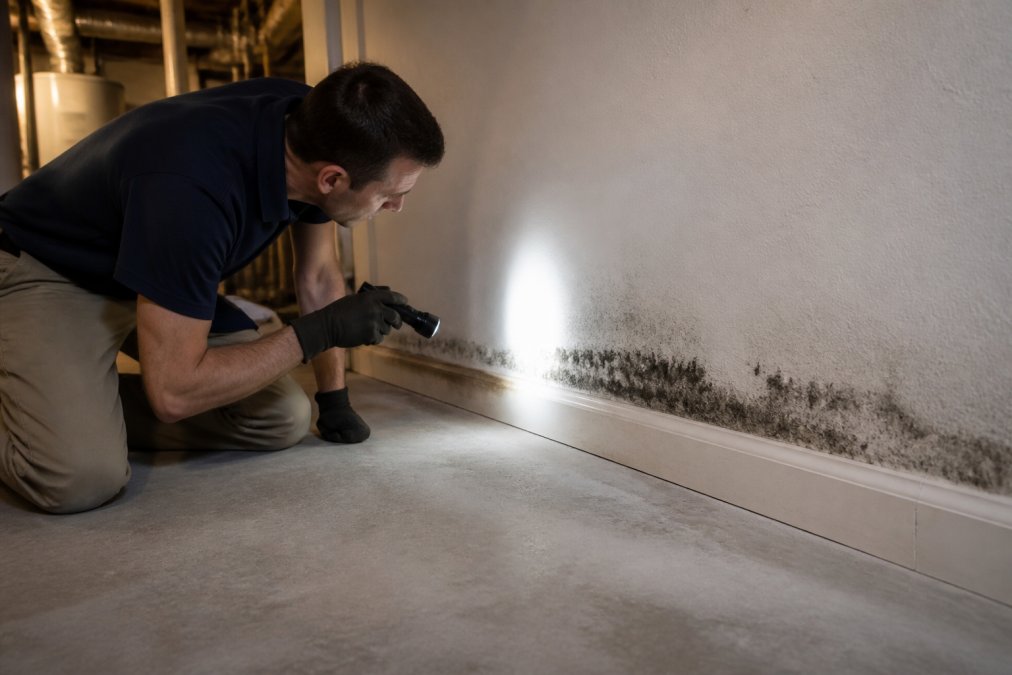
The visual timeline is predictable: walls look normal in the first 24 hours, faint discoloration may appear at seams and corners by day three, and dark spotting is usually obvious by day seven. If you smell mustiness before you see anything, assume hidden growth behind the wall and investigate with a moisture meter rather than waiting.
How to Prevent Mold After a Leak or Water Intrusion
Preventing mold after a leak comes down to speed: remove standing water, dry every wet surface within 48 hours, and keep humidity below 50%. These steps matter more than any product.
- Shut off the water source and document the damage with photos before touching anything.
- Extract standing water with a wet vacuum or pump within the first few hours.
- Remove wet carpet, padding, and any soaked porous material you cannot dry quickly.
- Run fans and a dehumidifier continuously, not intermittently.
- Check hidden spaces like crawl spaces, closets, and under cabinets for trapped moisture.
- Monitor with a moisture meter until readings match dry, unaffected areas.
DIY vs. Professional Mitigation: When to Call a Certified Team
Most articles on mold growth speed end with “call a professional” and leave it there. That is not useful if you are standing in a wet room at 11 p.m. deciding whether to rent a dehumidifier or pick up the phone. Some situations are genuinely DIY-able and some are not, and the line between them is more specific than most restoration blogs admit.
The DIY-Safe Zone
A water intrusion is usually manageable on your own when all of the following are true:
- The water came from a clean source (supply line, rain intrusion, appliance overflow), not sewage or floodwater.
- The affected area is small, roughly 10 square feet or less of porous material.
- The water has been present for less than 24-48 hours.
- The moisture is on the surface or in materials you can remove and discard (a small section of carpet, a throw rug, a single ceiling tile).
- You can see and reach the entire affected area, no water disappeared behind a wall or under a cabinet.
- No musty odor is present, and no one in the household has mold-related health symptoms.
If you meet all six, the playbook is straightforward: extract standing water, discard saturated porous material you cannot dry, run fans and a dehumidifier continuously, and verify with a moisture meter that readings match dry, unaffected areas. A cheap pin-type moisture meter is the most useful tool here, it tells you what your hand cannot.
The Professional-Required Zone
Hand the job to a certified team when any of the following is true:
- Category 2 or 3 water. Sewage backups, toilet overflow with waste, and outdoor floodwater carry contaminants that require disinfection, not just drying. This is not a DIY category under any circumstances.
- Water has been sitting more than 48 hours. Once colonization has started, cleaning the visible surface is not enough, hyphae have already grown into the material, and remediation means removal, not wiping.
- The affected area exceeds roughly 10 square feet of porous material, or the damage spans more than one room.
- Moisture reached inside a wall cavity, ceiling, or HVAC system. You cannot dry what you cannot reach, and ductwork that has been wet can distribute spores through the whole house every time the system runs.
- You can smell mustiness but cannot see the source. Odor without visible growth almost always means hidden colonization.
- Anyone in the home has asthma, allergies, or a compromised immune system. The margin for error shrinks, and airborne spore counts during a DIY cleanup can spike sharply.
- The building is a rental or a multi-unit property. Liability and disclosure considerations usually push these to professional remediation regardless of size.
What Professional Remediation Actually Involves
The [IICRC’s standards for professional water damage(/what-to-do-immediately-after-water-damage/) restoration | iicrc.org] exist precisely because drying a structure correctly requires more than a fan and a dehumidifier. A proper remediation scope typically includes moisture mapping to find hidden wet zones, containment to keep spores from spreading to unaffected rooms, calibrated drying equipment sized to the cubic footage involved, HEPA filtration and air scrubbing, removal of materials that cannot be dried, antimicrobial treatment where appropriate, and, critically, verification that materials are actually dry, not just dry to the touch. That verification step is the part DIY efforts almost always skip, and it is the reason mold comes back after a homeowner cleanup that looked successful.
For property managers, the calculus is even clearer: one missed wet wall becomes a recurring complaint across several units, and a second remediation dwarfs the cost of doing it right the first time.
A Simple Decision Rule
If you can answer “yes” to every item in the DIY-safe list, you can probably handle it. If even one item in the professional-required list applies, stop and call. When unsure, the tiebreaker is the moisture meter: if it reads elevated in a material you cannot remove and dry, that is a professional job regardless of how small the visible damage looks.
The decision is simple: if the water has been there longer than two days, if you can smell mustiness, if the water was contaminated, or if moisture reached inside a wall cavity, professional remediation costs less than living with recurring growth. If none of those apply and the area is small and reachable, a moisture meter and a weekend of drying may be all you need.
That is where Ness Restoration & Remediation Inc. comes in. Our IICRC-certified team provides 24/7 emergency response, uses advanced drying technology to minimize property damage, and handles direct insurance billing so you don’t have to manage paperwork while your home is torn apart. As a family-owned company trusted since 1996 and an IAQA council-certified mold remediation contractor, we back our mold work with a five-year guarantee and arrange third-party inspection.
Post-Remediation Prevention: Stopping Mold From Coming Back
Mold returns when moisture returns, so prevention after remediation is about controlling water, not cleaning surfaces. Three habits do most of the work.
First, fix the source, a slow supply-line drip or a grading issue that pushes water toward the foundation will undo any remediation if left alone. Second, manage humidity year-round with ventilation and dehumidification in crawl spaces and basements. Third, inspect after every storm or plumbing event, especially in the first 48 hours, when intervention is cheapest.
Crawl space encapsulation is one of the most effective long-term measures for homes in this region, sealing out ground moisture that otherwise migrates upward into living spaces. It addresses the cause instead of the symptom.
Water damage never waits, and neither does mold. If you are past the 48-hour mark, seeing discoloration, or smelling something musty, the safest move is a professional inspection before the problem spreads into your structure. Ness Restoration & Remediation Inc. offers 24/7 emergency response, certified mold remediation backed by a five-year guarantee, direct insurance billing, and crawl space encapsulation for long-term protection. Request an inspection with Ness Restoration & Remediation Inc. and get your property dried, verified, and protected.
Frequently Asked Questions
Can mold start growing in less than 24 hours?
Yes. Mold spores can germinate in as little as 24 hours when they land on a wet surface. The clock starts the moment water intrusion occurs. Within 24 to 48 hours, colonization begins and hyphae spread across porous materials like drywall and carpet. That is why the first day after a leak matters most. If you cannot dry the area completely within 24 hours, call a certified remediation team to assess the damage.
Does mold grow faster in humid or warm conditions?
Both matter, but humidity is the bigger driver. Mold needs relative humidity above 60% to proliferate. Temperatures between 77 and 86 degrees Fahrenheit create optimal conditions, but mold can still grow slowly at 50 degrees. In a humid climate, condensation on cold surfaces like pipes and windows creates enough moisture to support growth even without a visible leak. Keep indoor relative humidity below 50% to slow mold growth significantly.
What are the signs of mold growth in walls?
Look for discoloration on drywall, peeling paint, warped baseboards, and a persistent musty odor. Dark spots near water stains are a clear indicator. You may also notice increased allergy symptoms indoors or see visible fuzzy patches on caulk and grout. Because mold often grows inside wall cavities, a moisture meter and thermal camera are needed to confirm hidden growth. A certified inspector can identify mold behind walls before it spreads to structural framing.
Will mold go away on its own once the area is dry?
No. Drying stops new growth but does not remove existing mold, spores, or bioaerosols already released into the air. Dead mold spores can still trigger allergic reactions and affect indoor air quality. Porous materials like drywall and insulation usually need removal and replacement. Non-porous surfaces can be cleaned with appropriate products, but professional remediation ensures the contamination is fully addressed and the area is safe to occupy.